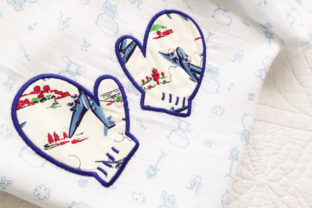
Snow Mittens Applique
When I first opened the Snow Mittens Applique file, I was looking for a winter design that could work on a custom tote bag for a client’s holiday market booth. The client wanted something cute but not overly childish, and the mittens drew me in immediately. The shape is balanced and the applique style keeps the stitch count reasonable while still delivering a crisp, finished look. After stitching a test version on a scrap cotton twill, I knew this design had real potential for small shop merchandise, personalized gifts, and even commercial embroidery projects. But like any applique, it has its strengths and its quirks. Let me walk through what you can expect when you load this file into your machine.
First Impressions and Visual Personality
The Snow Mittens Applique reads as a pair of mittens with a classic, cozy silhouette. The design is not overly detailed, which works in its favor. The applique layers are separated by color changes, so you get a clean base fabric shape, then the satin stitch outlines and any fill or running stitch accents. The overall mood is warm and inviting. It feels like something you’d see on a boutique kids’ sweater or a farmhouse-style kitchen towel. It does not try to be hyper-realistic; instead, it embraces the soft, handcrafted look that customers love on handmade products.
Because the design uses applique, the fabric choice for the background of the mitten shape matters a lot. I tested it with a wool blend felt and a standard cotton quilting cotton. The felt gave it a plush, dimensional look that would be perfect for a baby blanket or a patch. The cotton gave a cleaner, more traditional embroidery feel ideal for a sweatshirt or tote bag. The design is versatile enough to fit both a rustic winter aesthetic and a more polished holiday gift project.
Performance in Real Embroidery Work
I ran the Snow Mittens Applique on a single-needle machine with a 5x7 hoop, but the file includes four hoop sizes, so you can adapt it to smaller hoops if needed. The steps are separated by color changes, and the instructions advise not to color sort or combine colors. I followed that advice and was glad I did. The sequence is logical: first the placement stitch, then the tack-down, then the satin stitch outline, and finally any decorative details. The applique fabric positioning is straightforward, and the satin stitch density felt appropriate for the size—not too tight, not too loose.
Here are the key performance points I observed:
- Stitch quality: The satin stitch edges are smooth and consistent. I did not see any pulling or gaps when using a medium-weight stabilizer on the cotton twill test.
- Hoop size flexibility: With four sizes included, you can fit this on a 4x4 hoop for small items like baby bibs or caps, or use the larger version for a center chest design on a sweatshirt.
- Thread colors: The color changes are minimal—typically three or four steps. This keeps thread changes quick and reduces waste. For a commercial project, that’s a time saver.
- Applique base: The placement stitch is clear enough to see through the fabric, which helps when aligning the applique fabric. I recommend using a light box or marking the center if you are working with a dark or busy fabric.
One thing to note: because the design is an applique, the finished size depends on the hoop you choose. The smallest version might be too small for some details to read clearly, especially if you are using a thick fabric for the applique layer. I found that the medium size (around 4x4 inches) gave the best balance for most projects.
Where to Use This Design Carefully
Not every surface is ideal for the Snow Mittens Applique. Here are the situations where I would proceed with caution:
- Small hoop sizes: The smallest version will have a reduced detail area. The mittens are still recognizable, but the satin stitch outline becomes thicker relative to the shape. Test on scrap first.
- Textured or stretchy fabrics: Fleece, sweatshirt fleece, or rib knits can cause the applique fabric to shift during stitching. Use a cut-away stabilizer and a temporary spray adhesive to keep everything in place.
- Dark fabrics: If the applique fabric is lighter than the base garment, the contrast can be striking. But if you use a dark applique fabric on a dark garment, the design may lose definition. Choose your fabric colors carefully.
- Curved surfaces like caps: The design is not specifically optimized for caps. The mitten shape is fairly wide, so it might not fit well on the front of a structured cap. A flat tote bag or apron is a safer bet.
- Frequent washing: Applique designs can fray over time if the satin stitch is not dense enough. The Snow Mittens Applique has a decent satin stitch, but I would still recommend a light fusible web on the applique fabric to prevent edges from lifting after repeated washings.
How It Affects Product Value and Customer Trust
As a designer who sells finished products on Etsy and at craft fairs, I know that the stitching quality of an applique can make or break a sale. The Snow Mittens Applique, when stitched correctly, gives a professional, handmade look that customers associate with quality. The mitten shape is instantly recognizable, and the applique technique adds a tactile, layered feel that simple embroidery cannot match. This design would work well on:
- Custom apparel: Sweatshirts, t-shirts, hoodies, baby onesies, and toddler leggings.
- Home decor: Pillow covers, tea towels, blankets, nursery decor, and wall hangings.
- Gifts: Holiday gifts, wedding gifts, personalized baby gifts, and "welcome winter" presents.
- Boutique products: Tote bags, aprons, caps, and embroidered patches that can be sold separately or attached to other items.
- Digital products: If you sell design assets, the Snow Mittens Applique comes with 9 formats, which makes it easy to offer as a download. Just verify the licensing terms before selling the digital file.
When a customer sees a clean applique with crisp satin stitch edges, they perceive the product as durable and well-made. This builds trust and can justify a higher price point. For small shop owners, using a design like this on a holiday sweatshirt or a winter-themed tote bag can become a signature item that customers return for.
Practical Designer Notes for Getting the Best Result
Before you stitch the Snow Mittens Applique on a client project or a product for your shop, take these steps:
- Test on scrap fabric first. Use the same fabric you plan to use for the final product. Check the stitch density, see if the satin stitch covers the edge of the applique fabric completely, and note any thread tension issues.
- Check thread color contrast. The design uses a few colors. If you want to change the thread colors, do so in the software, but do not combine or reorder the steps. The applique sequence relies on the order.
- Review stitch density. The applique design should be moderate. If the satin stitch feels too dense, reduce the density slightly in your software, but be careful not to create gaps.
- Confirm hoop size. The file includes four sizes. Choose the one that fits your hoop and your project. Do not resize the design arbitrarily in your machine, as that can distort the applique shapes.
- Inspect small details. The mittens do not have tiny lettering or very fine details, so the design is forgiving. However, if you are using a very small hoop, the satin stitch may become thicker relative to the design. Test before committing.
- Test in black and white mockups. If you are selling finished products, create a mockup showing the design on a garment. This helps customers visualize the size and placement. The design works well for a centered chest or left chest position.
- Compare light and dark fabric backgrounds. The applique fabric color will dominate the look. For a cohesive winter theme, try a cream or white applique on a dark blue or red garment, or a red applique on a natural linen tote bag.
- Use proper stabilizer. A cut-away stabilizer is best for most garments. For hats or dense fabrics, a tear-away may work, but test first. The applique adds weight, so the stabilizer needs to support it through multiple passes.
- Check licensing. The product description says "If you are usin" – I assume it continues with license terms. Before using the design for commercial embroidery or selling digital files, confirm the license. Many designs allow you to sell finished products but not the digital file itself. Be clear on this.
Final Thoughts on the Snow Mittens Applique
The Snow Mittens Applique is a solid choice for anyone who wants a winter-themed embroidery design that is quick to stitch, easy to position, and visually appealing. It fits naturally into the Winter category and works well as a standalone motif or a complement to other snow-themed designs. I would use it for a custom sweatshirt order, a batch of holiday tote bags for a boutique, or a set of baby gifts for a winter baby shower. The applique technique gives it a handcrafted feel that machine embroidery alone sometimes lacks, and the multiple hoop sizes make it adaptable to different product types.
If you are an Etsy seller or a small shop owner, I recommend adding this design to your digital library. Test it on a few different fabrics, find the stabilizer combo that works best for your machine, and then offer it as a customization option. Customers love the look of a well-executed applique, and the Snow Mittens Applique delivers that without being overly complicated. Just remember to follow the color change instructions, use a good stabilizer, and always test before you stitch the final product. That is the mark of a professional embroiderer, and this design will reward that attention to detail.